Pen and Shape Tools


Assignment #1: Digital Woodcut
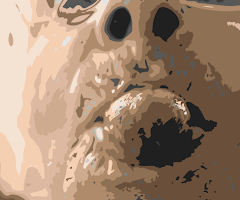
You will make a digital woodcut in Illustrator using an original photograph, design or image created by you. Your woodcut will be generated through an additive process of layering shapes. You will use the pen tool to complete shapes, as well as the shape tool for prefabricated shapes (circles, squares…). Remember to keep shapes hard-edged and sharp. See links for original and digital woodcuts on the class blog.
Purpose: This assignment is a valuable introduction to the basic use of specific tools in Adobe Illustrator. The shape tool, pen tool, transparency option and color palette will be a necessity when designing vector-based items such as symbols and logos in your future work.
Goals:
• To create a digital woodcut in Illustrator that gives the appearance of an original woodcut by layering shapes, some of which are sharp and hard-edged.
• To use the pen tool in a planned out and controlled manner. You will learn to control lines
• To use the shape tool for simple circles, ovals, squares, rectangles… when appropriate.
• To create a strong composition keeping in mind design principles such as:
Emphasis, Balance, Rhythm, Contrast, Movement and Harmony.
• To begin to understand the difference between vector and raster images and in some cases transfer raster images into Illustrator.
Guidelines:•Your Illustrator woodcut created in Adobe Illustrator may be horizontal or vertical and must be letter size.
• Use full color when creating your shapes and marks
• Print two copies of your completed woodcut in full color on letter size paper. One copy will be mounted in class for critique and the other will be placed in your portfolio.
•Save your work! A CD will be handed in at the end of the semester containing all of your
coursework.
• Post your woodcut to your blog. See the "Blog" topic on directions for posting.
•Assignment must be completed for group critique by 1/22/09.

Assignment #2: Visual Communication: Symbols
The purpose of these assignments is for you to visually communicate ideas without the use of words in a clear and effective manner. You will work through the graphic design process of research, idea-development, visualization and execution through studio and computer practice.
Part A: Design a symbol for three of the subjects listed below or choose your own generic subjects (type of place, event, emotion…):
• Tattoo Parlor • Bank • Real Estate Agency • Hotel • Casino • Construction Zone • Sports Complex• Skateboard Park • Arcade • Rock Club • Rock Concert • Arts Festival • Engagement• Marriage • Breaking-up • Election •Inauguration • War • Winning • Losing• Rock-n-Roll • Hip – Hop • Emo • Punk Rock • Rap
Part B: Combine two existing symbols to create a new one. Research your symbols and carefully choose two that will intersect well. You must consider the original meanings behind the symbols you choose when creating your new meaningful symbol.
Part A & B
Goals:
• To communicate an idea in a simple and effective manner
• To use the elements and principles of design to create an interesting visual symbol
• To conquer the design process through problem solving
• To execute well-crafted works
• To use knowledge acquired in Illustrator for coloring and altering symbols
• To practice controlling the shape tool and pen tool when altering symbols
• To further explore the Illustrator palettes
• To present works in a clean, professional manner
Part A
Guidelines:
• Materials: three 11”x14” pieces of smooth Bristol board
Use black and white media only: ink or gouache
• Make thumbnail sketches and work out your ideas in your journals before executing your project
• Draw a shape on the center of each piece of Bristol
• Create a symbol to fit entirely within each shape
The shape acts as the outline for the symbol; give thought to how you will place the image within this shape
• Do not use type as part of your symbol design
• Choose your most successful black and white symbol design (determined by group critique)
• Scan your best symbol into the computer
• Use Illustrator to color your symbol accordingly
Choose appropriate colors to convey your message
Consider the meaning and mood when choosing colors
• On a sheet of white paper, type a short, yet thorough description explaining why you chose the media, colors, imagery, etc. to create your final color symbol
• Print two copies of the completed symbol in full color on letter size paper
One copy will be mounted in class for critique and the other will be placed in your portfolio
• Mount the completed color piece on black illustration board with 1 1/2" borders all around
• Place your name and the date at the top left corner and tape your description to the back of the mounted piece
•Save your work!
A CD will be handed in at the end of the semester containing all of your coursework
• Post your symbols (before coloring and after) to your blog
See the "Blog" topic on directions for posting
•Assignment must be completed for group critique by 2/12/09
Part B
Guidelines:
• Materials: 11”x14” illustration board
Use black and white media only: ink or gouache
• Make thumbnail sketches and work out your ideas in your journals before executing your project
• Draw a shape on the center of your illustration board
• Make your symbol fit entirely within the shape
The shape acts as the outline for the symbol; give thought to how you will place the image within this shape.
• Do not use type as part of your symbol design
• Scan your symbol into the computer
• Use Illustrator to color the symbol accordingly
Choose appropriate colors to convey your message
Consider the meaning and mood when choosing colors
• On a sheet of white paper, type a short, yet thorough description explaining why you chose the media, colors, imagery, etc. to create your symbol
• Print two copies of your completed symbol in full color on letter size paper
One copy will be mounted in class for critique and the other will be placed in your portfolio
• Mount the completed color piece on black illustration board with 1 1/2" borders all around
• Place your name and the date at the top left corner and tape your description to the back of the mounted piece
•Save your work!
A CD will be handed in at the end of the semester containing all of your coursework
• Post your symbols (before coloring and after) to your blog
See the "Blog" topic on directions for posting
•Assignment must be completed for group critique by 2/12/09
Assignment #3: Type Illustration


Choose one of the following action words and a font which is symbolic of both the meaning and emotion conveyed by your word.
Bake
Build
Collapse
Dance
Destroy
Drink
Eat
Exercise
Explode
Fight
Find
Fly
Grow
Hunt
Jump
Kick
Look
Lose
Play
Pull
Push
Punch
Repeat
Run
Shrink
Sing
Throw
Walk
Illustrate your word using text as the basis for your design by enlarging the first letterform (the design of the shape of an alphabet letter) in your chosen font and altering it using a variety of techniques (painting, printing, photographing…). After altering the letterform, you will scan it into the computer, then place it into a 6" x 8" format with your action word or a sentence containing your action word using the original font. The point of this assignment is to learn how to activate your page using type as the main component in your design. Examples will be shown in class. Your completed design will be printed in full color. Your image will be 6” x 8” backed by the same size illustration board.
Goals:
• To work through the design processes of research, idea-development, visualization and execution through studio and computer practice
• To communicate an idea in a simple and effective manner
• To use the elements and principles of design to create an interesting design
• To begin to incorporate text with image
• To choose an appropriate font for your action word which expresses meaning and emotion
• To understand the Mac's Font Book and how to download free fonts online
• To use knowledge acquired in Illustrator for completing your design
• To present well-crafted work in a clean and professional manner
Guidelines:
• Choose an action word
• Find an appropriate font using Internet free fonts (Google search) and the Mac’s font book
• Hand-alter the word’s first letterform using the font you have chosen
• Open a new 6" x 8" file in Illustrator and place your altered letter into your document
• Use Illustrator to add your action word or a sentence containing your action word to your design
• Polish and complete your design in Illustrator
• Print two copies of the completed design in full color on letter size paper
One copy will be mounted in class for critique and the other will be placed in your portfolio
• Mount the completed color piece on black illustration board with 1 1/2" borders all around
• Place your name and the date at the top left corner and tape your description to the back of the mounted piece
•Save your work! A CD will be handed in at the end of the semester containing all of your
coursework
• Post your design to your blog
See the "Blog" topic on directions for posting
•Assignment must be completed for group critique by 2/24/09
Logo Tutorials


Assignment #4: Logo Design
This assignment will address some fundamentals of typography combined with symbolic imagery. It is important to consider how you would capture the attention of a client or prospective buyer when designing/ redesigning your logo. Your assignment is to redesign an existing logo or create a new logo for an existing company. You must include at least three presentations of design options for group critique before completing your Logo in Illustrator. Keep your logo as simple and clear as possible.
Goals:
• To work through the design processes of research, idea-development, visualization and execution through studio and computer practice
• To communicate an idea in a simple and effective manner
• To use the elements and principles of design to create an interesting design
• To incorporate text with symbolic imagery
• To choose an appropriate font for your logo which expresses meaning and emotion
• To understand the Mac's Font Book and how to download free fonts online
• To use knowledge acquired in Illustrator for completing your design
• To present well-crafted work in a clean and professional manner
Guidelines:
• Decide what it is you are trying to express about the business and choose the word(s) you will focus on
• Gather information and images that may help you
• Consider and experiment with various fonts to find the most appropriate text style to build on, transform or carve away from
There are plenty of free fonts to download from the Internet (Google- free fonts)
• Sketch your ideas in your notebook and prepare to present them to your peers
• Choose your strongest logo design
• Further alter your text to accommodate your graphic concept by using the Illustrator knowledge you gained previously such as: using live trace, layering shapes, adding drawings, or playing with effects
• Polish and complete your design in Illustrator
• Print two copies of the completed design in full color on letter size paper
One copy will be mounted in class for critique and the other will be placed in your portfolio
• Mount the completed color piece on black illustration board with 1 1/2" borders all around
• Place your name and the date at the top left corner and tape your description to the back of the mounted piece
•Save your work! A CD will be handed in at the end of the semester containing all of your
coursework
• Post your design to your blog
See the "Blog" topic on directions for posting
•Assignment must be completed for group critique by 2/24/09
2/10 Exercise: Digitally photograph examples (at least 15) of logos that successfully communicate their ideas through text, symbol or both. Save your images to a flash drive. We will view them in class. What are your examples trying to communicate? What methods are used to communicate the ideas? Describe the details that make your examples successful.
No comments:
Post a Comment